Followers

Popular Posts

Powered by Blogger.

Template By INTERIOR

Saturday, October 31, 2009

Bedroom Interior DesignV2

Modern bedroom design, Bedroom idea, bedroom furniture, bedroom Sets, Bedroom Decor


Bedroom Interior DesignV2

Modern Minimalist Apartment

Minimalist Bathroom, Minimalist Bedroom, Minimalist Kitchen, Modern Minimalist, Minimalist Living Room, Minimalist Apartment Interior, Minimalist Design


Modern Minimalist Apartment

Lemon and lime dining room

A hi-gloss dining table and white walls transforms this dining room into a contemporary and airy space. Zesty colour is added with vibrant dining chairs upholstered in cool blue stripes, and bright tableware. housetohome

Friday, October 30, 2009

Modern Japanese Bedroom Style

Modern bedroom design, Bedroom idea, bedroom furniture, bedroom Sets, Bedroom Decor


Modern Japanese Bedroom Style

Minimalist Interior by Creative Mixed Media

Minimalist Interior by Creative Mixed Media


Minimalist Interior by Creative Mixed Media

Dining Room Projects, Part I

There were lots of fun little projects from my dining room redo that I have been anxious to share with you all! I started writing this post thinking that I could get it all in one long entry, but I think this is going to be a two-parter!!

First up, I've had these little brass and lucite lamps for a long time now. They are sort of a little too...fancy for my taste, but I liked the scale in the room.

When I found these square lamp shades at Target, I knew I could make the lamps work.
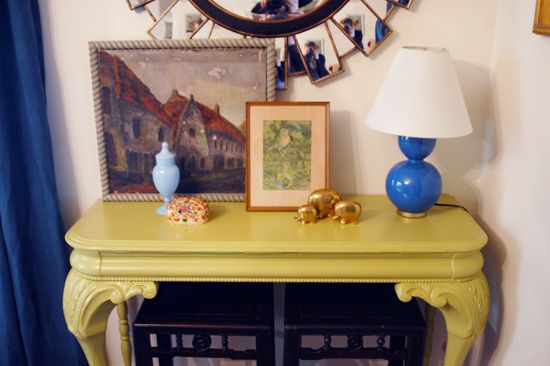
I wanted the shades to have a little color and texture so I ordered some grasscloth wallpaper samples to use for covering the lamp shades. But, thankfully, the order got messed up, and I was able to find this grasscloth for $3/yd at a fabric store in Philadelphia (BTW, if you live anywhere near Philly, please go check out Fabric Row! It's one amazing fabric store after another, with great deals to be had.)


{And yes, that is my big baby belly popping into the shot! Whoops.}

This was a really simple project. I just cut a strip of the grasscloth long enough to wrap around the entire shade. Then I used my trusty fabritac glue to attach the grasscloth, one side at a time, pressing and smoothing all the while.


Once all the side were covered, I trimmed the grasscloth down all the way to the edge of the shade.


Then I glued pale aqua cotton twill tape trim (also from the fabric store) very carefully around the outside perimeter of the shade first. Make sure your lines are straight and uniform here.


After some drying time, I carefully glued and folded down the edges.


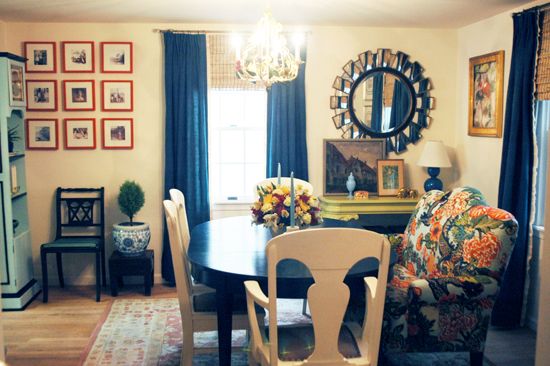
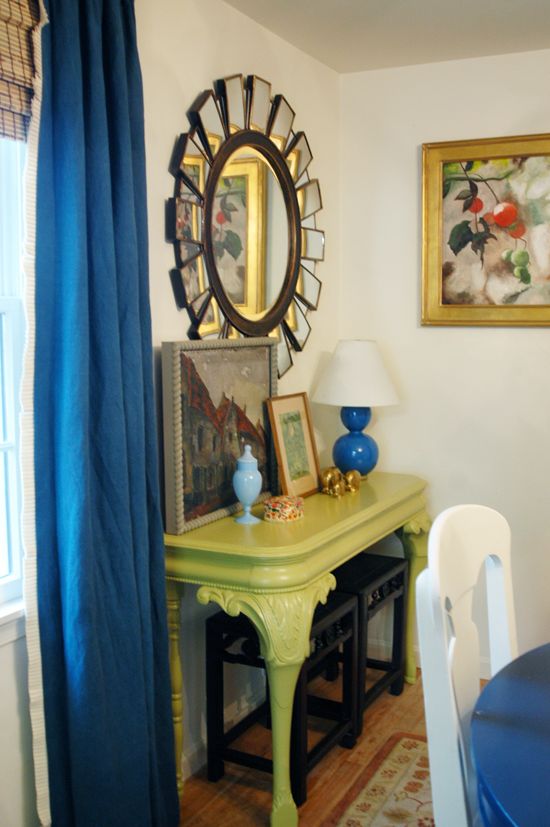
Pretty, right? I think black trim would have been very pretty next to the grasscloth, but I felt like I needed the aqua with my orange shelves...


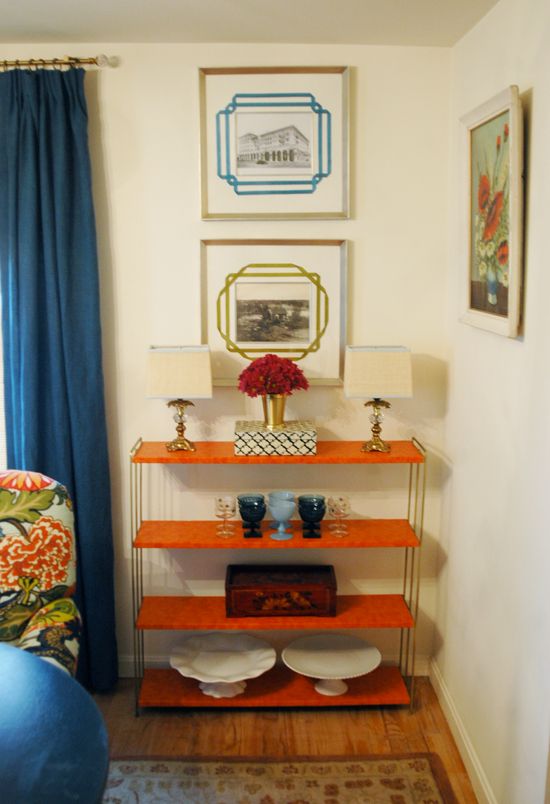
Speaking of the orange shelves...


These ugly shelves were freebies. To freshen up the brass rails on the side, I VERY lightly sprayed the metal with some Krylon gold metallic spray paint. Then I wiped down the shelves really well for a super clean surface for the contact paper to adhere to.


I randomly found about 3/4 of a roll of this croc contact paper on eBay. It is pretty expensive if you buy it new, but the rolls are HUGE and you could easily put up the remnants of the roll on eBay after you finish, like my seller did. Or split the roll with a friend.

{PS if you're looking for snakeskin, zebra or leopard contact paper, check out this much cheaper site}

This project couldn't have been easier - just trim to size, peel and stick!


I think it's a fun pop of color and texture. The shelves still need some better styling, but I like the piece a lot.
The artwork above the shelves was seriously lacking. In my storage I had two frames from an Aarons Brothers sale that were the perfect candidates for this project from Martha's new Crafting book.

The directions in the book (pg. 183 - can't find them online) aren't very specific. And there aren't templates for the patterns in the back of the book, so I was a little nervous about doing the pattern myself.


But it was actually pretty easy to just eyeball the design. The basic idea is to use bias tape trim to make a pretty border for picture mats. All you really need is a ruler, pencil, glue and a paint brush. And the bias tape, of course, which is available at fabric stores. Martha also carries a couple of colors in her ribbon line for Michaels, though you pay a premium for those! My trim was $0.30 a yard on Fabric Row.


I used a great paper glue called Zip Dry. It dries perfectly clear and if you mess up and go outside the lines, it rubs off sort of like rubber cement. Make sure to apply with a brush for a thin and flat application. And work in small sections because the glue dries pretty fast, as the name suggests.


Again, the basic idea is to draw a few straight lines with a pencil to act as a guide as you glue and smooth down the bias tape. The only sort of tricky part is the folding on the corners, but that got much easier after a few tries.


Here's the finished result. I decided to use a peacock blue and a chartreuse green and I love the contrast.


I was able to put together this entire wall (lampshades, orange shelves and trimmed out frames) in an afternoon. So please don't let my long and probably confusing instructions stop you from trying these projects!! They really are easy, I promise.


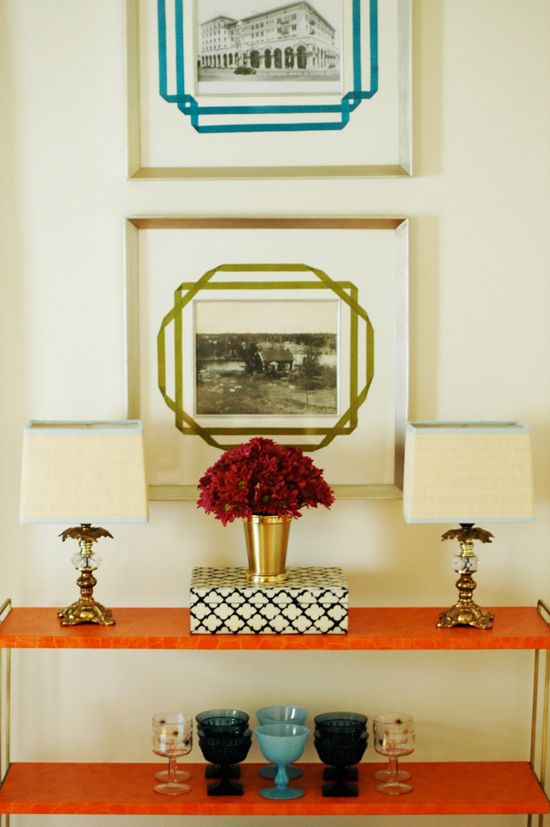
Come back for a few more projects on Monday. Have a GREAT weekend! Happy Halloween!


Thursday, October 29, 2009

Modern Airy Bedroom Interior Design

Modern bedroom design, Bedroom idea, bedroom furniture, bedroom Sets, Bedroom Decor


Modern Airy Bedroom Interior Design

Minimalist Kitchen With Mens Chair Styles

Minimalist Kitchen With Mens Chair Styles


Minimalist Kitchen With Mens Chair Styles

House Tear Down

With limited land available, especially lakefront properties, many people are purchasing old camps and cottages to tear the house down and rebuild a new, energy efficient home.

Traditionally, a bulldozer or other large piece of equipment levels the house in a matter of minutes and the debris is taken to a landfill. A green alternative would be to tear the house down in stages, carefully preserving the material and selling it at a demolition auction.

What can be salvaged and reused from a tear down?

  • Building components such as doors, windows, plumbing fixtures, etc.
  • Glass
  • Metals
  • Brick
  • Wood
  • Asphalt
  • Concrete
  • Gypsum
  • Plastics
  • Landscaping, including trees, stumps, and rocks


On the other hand, you might want to check out a demolition auction to find recycled materials if you are building a new home or remodeling your existing home. These types of auctions are held at the house to be torn down, and bidders are allowed to tour the home prior to the auction. You can get everything from fixtures, appliances, flooring, and walls.

Tip: Be prepared to be required to remove the items yourself.

Idea : Tree with tree pot like giant plant


Are you looking for some ideas for your garden ? Have you ever tought at a pot for a tree ? Just take a look at these images to see how a tree would look like in a pot. The Treepot can create the illusion that there is actually a pot, but the pot is made out of 2 identical parts.


It can be placed around trees which are already there, so no cutting, chopping otherwise digging is necessary, simply click the 2 parts of the Treepot around it also top up with gravel. The pot also provides a perfect seating place also can be filled with water to weigh it down. The Tree Pot has 120 cm diameter, and 50 cm high, and if you want to order more than 6 pieces they ( PID ) can make it any colour you want.


Wednesday, October 28, 2009

Palm Springs Mid-Century Modern Bedroom

Modern bedroom design, Bedroom idea, bedroom furniture, bedroom Sets, Bedroom Decor


Palm Springs Mid-Century Modern Bedroom

Interior Small Apartment Ideas

Minimalist Bathroom, Minimalist Bedroom, Minimalist Kitchen, Modern Minimalist, Minimalist Living Room, Minimalist Apartment Interior, Minimalist Design

Bright, Happy Dining Room

My house is dark. There are two HUGE elms in our front yard that make the natural light in our house less than abundant. And we can't paint the walls in our rental. Check out the sad before pictures of our dining room:


Since we will live here for only a year, I decided to go with a really bright and fun color scheme for the room.


I reupholstered the $50 Craig's list settee myself earlier this year.

Before:


After:


{And, yes, I am slightly embarrassed that Chiang Mai pops up so much around here...}

The table is a mid-century Drexel piece that seats 12 with all the leaves installed. I love it. It was purchased for $50 from a Craig's list seller who had "distressed" it to "look like a Pottery Barn table."


There were 10" long scratches in the surface and perfect phillips head "star" screwdriver gouges! A little bit of wood filler and some sanding helped a lot.


The table's been painted black for most of the time I've owned it, but I recently painted it this really moody ink blue color that I love, called "Umbrella" from Martha Stewart.

The chairs were purchased last fall at the Brimfield antique show. They were in really bad shape when I got my hands on them...


I blogged about them here. They are painted one of my favorite creamy white colors, Martha Stewart's 'Macaroni.'


I had planned on putting down a seagrass rug, but I actually really like the way the PB Collette rug looks in here. I like the muted tones layered with all the really bright colors.


I sewed the drapes myself using peacock blue linen fabric that I bought for $1 a yard at a local fabric store because it had been sun bleached. I simply dyed all the fabric with some RIT in the washing machine and fixed the discoloration. This saved me some serious cash.


I used cream twill tape trim from eBay for the box pleated accent on the leading edges. You can purchase a similar trim at M&J.

The tortoise shell-looking bamboo shades were on clearance at Home Depot (though they can be purchased full price here). There were only two shades left at the store and they were different widths, but you can't tell layered under the drapes.


Remember the clock?


I cut off the scalloped apron and added $5 worth of moulding to the sides.


The whole thing got a coat of Martha Stewart's 'Vintage Map' and then I trimmed out the moulding with glossy black paint. I'm still waiting for the brass ring pulls to come in for the bottom cabinet doors.


I bought nine IKEA Ribba frames for $7.99 each. I can't find the link online, but they were a natural wood color before I spray painted them the persimmon color.


I photoshopped some old family photos for the frames and I love getting to see images that remind me of our family heritage every day.


The tole chandelier was another Brimfield purchase ($40).


I bought a very pretty gold-leafed plein air frame for a client a few months ago and didn't end up using it, and I really wanted to incorporate in my own home. Rather than buying a painting to fit the frame, I scavenged my art supplies in the basement for an old 16x20 blank canvas and some oil paint to create a VERY rough version of this image from Lonny.


I don't love it, but I guess it's fine for now.


The server was a birthday gift a few years ago from my mom. It used to be an old dining table that was cut down and two new legs were added to the back to make it console table sized. I gave it a coat of chartreuse green paint for the dining room redo.


The Chinese stools were a total craigs list score and have a permanent home under the server table. The large sunburst mirror is from Home Goods. I bought it a few months ago.


That's it for part one. I've got lots of fun DIY projects from other parts of this room that I can't wait to share with you all!!
Related Posts Plugin for WordPress, Blogger...

Blog Archive