Followers

Popular Posts

Powered by Blogger.

Template By INTERIOR

Showing posts with label DIY. Show all posts

Thursday, March 25, 2010

A Fabulous DIY Project!

I was over visiting my friend Marian at Miss Mustard Seed this week and I have to tell you her recent project stopped me in my tracks.
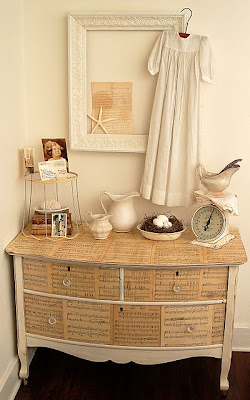
Marian took a $6.00 dresser she purchased at an auction last fall and turn it into a work of art!
The veneer was chipped and bubbled and beyond her ability to repair. So, she decided to paint it and then cover it with antique sheet music. Isn't this a wonderful effect?
And in case your feeling crafty and inspired she has more photos and the step by step instructions here.
This is only one of her many projects, so don't miss a visit to her blog, Miss Mustard Seed.
By the way, she is part of So You Think You Can Decorate Competition; so if you want to see other great projects, or vote for hers, click here.
Thanks for inspiring us, Marian!! I am off to search the attic to see what I can create!!!

Saturday, February 13, 2010

All the tools of the trade...


So we now have all the equipment to put up the wallpaper. Stay tuned for more before and after pictures!! Kellie xx


Photos by Kellie Collis for Ada & Darcy

All the tools of the trade...

So we now have all the equipment to put up the wallpaper. Stay tuned for more before and after pictures!! Kellie xxPhotos by Kellie Collis for Ada & Darcy

Monday, February 8, 2010

Sharing your tips with me! Please?!


Luke is getting himself organised to hang this wallpaper. I received some fabulous advice from Mel's Rose Place ; "One thing i found with the glue is that it stays wet for a LONG time so there is no rush in getting it all up quickly. Think that is where i went a bit wrong in that i tried to rush it believing that the glue was about to dry. Mine was a powder that you mixed up into a glue , like a cake mix!! I also found it was easier to trim once it was all dry and now being day 2 mine looks 100% better than it did yesterday."

This lovely advice made me realise, there are so many clever people out there, surely I can use your knowledge to help Luke along? I would love to hear from you if you have hung wallpaper, read anything about hanging wallpaper or perhaps you just have well something good or bad to say about it! Thank you from me and a BIG thank you from Luke in advance. Kellie xx

Sharing your tips with me! Please?!

Luke is getting himself organised to hang this wallpaper. I received some fabulous advice from Mel's Rose Place ; "One thing i found with the glue is that it stays wet for a LONG time so there is no rush in getting it all up quickly. Think that is where i went a bit wrong in that i tried to rush it believing that the glue was about to dry. Mine was a powder that you mixed up into a glue , like a

Wednesday, January 27, 2010

Inspiration 1.21

From the home of the very talented and very lovely Lauren of Pure Style Home. P.S. that amazing faint spring green wallpaper, is not actually wallpaper. It was done with stencils. See how Lauren and her husband got the look here.

Inspiration 1.21

From the home of the very talented and very lovely Lauren of Pure Style Home. P.S. that amazing faint spring green wallpaper, is not actually wallpaper. It was done with stencils. See how Lauren and her husband got the look here.

Thursday, November 12, 2009

Clover Table


I think this Shamrock table from Target could, with a little ingenuity and elbow grease, turn into something like this $500 table from Oomph.


Also, I love this Carnation Table. Just sayin.

Tuesday, November 3, 2009

Dining Room Projects, Part II

Next up in the dining room project tutorials...

I had a very old (and not particularly special) oil painting that I got for half a Euro at a flea market in Brussels. I thought it would look nice in my dining room because it's mostly neutral, but has a little pop of orange-red. It really needed a frame though, and since European canvases are not the same size as American standard sizes (and it's old, I think before there were standard sizes), I knew I would have to get a custom frame.

These two options from Michael's were along the lines of what I wanted - small and somewhat understated. Guess how much though, even with a 60% off sale? $175 each. For just a little bit of moulding! Custom framing is crazy expensive.


I saved myself all that cash by picking up a set of these framing slats on that same trip to Michael's. There are several finishes to choose from and then it's just a matter of buying the correct length and width slats for the painting. With my coupon, the frame was $10 total.


I stopped by Home Depot on the way home and picked up an 8-foot length of decorative moulding for $5. I liked the rope moulding (below) a lot and it worked well for this project because it was the exact width as my Michael's frame.

When I got home I assembled the frame according to the package directions, with a little bit of wood glue. While that dried, I laid out my moulding on top of the frame and marked the corners off. {Note: I probably could have used a miter box here, but I'm lazy and knew I was going to fill the corners}


Then I just used my very favorite $7 coping saw and easily made the corner cuts. I used wood glue to attach the pieces to the frame front and then filled in the gaps in the corners with wood filler.


Once everything was dry, I spray painted the new frame with Krylon's Grecian Stone spray paint. I was going to gold leaf the frame, but I ended up really liking the gray in the room. The frame is not museum-quality, but it was only $15.


Next project! Who doesn't love a good gourd lamp? I found this one at TJ Maxx on major clearance for $4.50. I think it was so cheap because the brand is Amy Coe, which I'm pretty sure is a nursery line? Yeah, so were not talking about a Christopher Spitzmiller lamp here, but I thought the shape was pretty.


First, after taping off the cord, I spray painted only the base gold.


After letting that completely dry, I taped off the gold and spray painted the body of the lamp a nice peacock blue color from Sherwin Williams' clearance aisle. Unfortunately the color is much less teal in actuality, and more of a true blue, but I think it's fine in the dining room.


I finished off the lamp with a few coats of Wipe On Poly in the gloss finish, to really shine the lamp up.


The last project to share today was really simple. I reupholstered the drop seat of this little side chair with some leaf green linen that was pretty, but a little boring as it was.


So I taped off stripes with some frog tape and spray painted the seat (a la Eddie Ross) with the same blue that I used on the lamp.


I think the stripes are a fun pop of pattern in the room! And they don't look spray-painted on, even up close.


I'm off to do some fabric shopping with my mom and sister, who are in town visiting for the week. Hope you're having a great Tuesday!

Sunday, October 25, 2009

YOUR Pelmets

Thanks for all the reader contributions! I'm really glad that so many of you are finding this simple tutorial helpful.

Check out what some fellow LGN readers put together with just a little foam board, batting and fabric:

Heather at Doodlebuds made her pretty pelmet box out of blue linen fabric and added white pom-pom trim to the bottom with some pins!


Lauren used fabric from Mod Green Pod for her bedroom's pelmet boxes...


LuAnn in Oklahoma made the pelmet box for her 4 year old daughter's room using some soft yellow dotted chenille fabric she had laying around and some fabric leftover from a twin sheet set.


Love the orange and pink print that Rachel used in her project!


Sara at Pretty, Pleasant and Practical blogged about her pelmets here:


After Noelle tried the pelmet box tutorial, she was inspired to redo her whole bedroom! Isn't is ADROABLE??


Kellie used this perfect ticking stripe and yellow ball trim to make two pelmets for her kitchen.


Lisa's daughter now has a very fun and funky room. Look closely, her pelmet box is monogrammed!


Minda in San Diego used white denim for her boxes and glued black ribbon to make the accent. She used chiffon for the sheers, and the curtains are blackout lined, which Minda loves for the draping quality and for how dark she can make her room!


Felicia used this graphic Victoria Hagan fabric for the pelmets in her boys' room. The curtain fabric was from a Silk Trading Company close out.


Clair used a punchy blue fabric with coordinating navy trim and curtain panels.


Emily got together with two of her girlfriends on a Friday night for a pelmet box making party! She said it was so much fun! Her pelmet is covered in hot pink dupioni silk, which she made for her pink and grey bedroom.


Sarah used nail head trim on her bedroom pelmets...


Banks and her friend in Atlanta used this punchy fabric for her pelmet box. She also mentioned she used the same fabric to line the inside of her old tacky 70's china cabinet after painting it robin's egg blue! Pretty! Send more pics, Banks!!


Ada Marie at Spark! said all she needed was 1/2 yard of P. Kaufmann's Curly Q in Green Tea for the pelmet box over her hallway dormer. She made the box so snug that she didn't even have to use nails -- the pelmet is suspended between the two walls! She likes that it would be very easy to pull down and re-cover again later.


I love how Julie's daughter's room turned out! Darling! (PS she got the pair of Ghost chairs on Overstock)


Thanks again for all the contributions!

I tried to include here any information that I had, but please leave a comment if you have a question for one of the contributors; hopefully they'll be able to answer.

Also, I'm working on setting up a Flickr group for these images and hopefully in the future readers can keep adding to the collection. I'll keep you posted...
Related Posts Plugin for WordPress, Blogger...

Blog Archive